Good custom rigid box artwork starts with a vector logo, a layout that respects how paper wraps around greyboard, and separate layers for foil, emboss or spot effects. Custom Rigid Boxes Now turns whatever you send into a free mockup within 24 hours, so you can check placement on the lid, base and insert before anything is produced.
- Vector logo files (AI, EPS, SVG or vector PDF) give the cleanest foil, emboss and print edges.
- Rigid box wraps fold over edges and corners, so keep key artwork away from fold lines.
- Foil, emboss and deboss each need their own solid single-color layer.
- Free mockup within 24 hours, unlimited free revisions, minimum order 12.
What artwork do you actually need to order custom rigid boxes?
To order custom rigid boxes you need three things: your logo as a vector file, a short note on where it should go (lid, base, inside lid, sleeve or insert), and your brand colors. Everything else, from the wrap layout to the die line, can be built by the Custom Rigid Boxes Now team and shown to you in a free mockup within 24 hours.
Many first-time buyers assume they must hand over print-ready dielines. They do not. A rigid box is built from greyboard wrapped in printed paper, and the wrap layout depends on the style you choose, whether that is a magnetic-closure rigid box, a two-piece rigid box or a drawer rigid box. Because each style folds differently, it is faster to send clean source art and let the layout be fitted to the box.
If you already have a full packaging design from an agency, send that too. The mockup will show how the flat design lands on the real box structure, including where corners and turn-ins fall.
Which logo file formats work best for rigid box printing and finishing?
Vector formats work best for custom rigid boxes: AI, EPS, SVG or a PDF saved from a vector program. Vector art scales to a full lid or a tiny inside-lid mark without blurring, and it gives foil stamping and embossing the crisp outlines those processes need. A high-resolution raster file can work for full-color photographic wraps, but logos and type should stay vector.
| File type | Best use on a rigid box | Watch out for |
|---|---|---|
| AI, EPS, vector PDF | Logos, type, foil and emboss layers | Convert fonts to outlines before sending |
| SVG | Simple logos and icons | Check that gradients and effects export correctly |
| High-resolution PNG or TIFF | Photographic wraps and full-color patterns | Low-resolution files look soft on a large lid |
| JPG from a website | Reference only | Usually too small and compressed for print |
If the only logo you can find is a small JPG pulled from your website, send it anyway along with a note. The team can tell you in the mockup whether it will hold up or whether it is worth finding the original vector file from your designer.
How does a rigid box wrap change where your artwork should go?
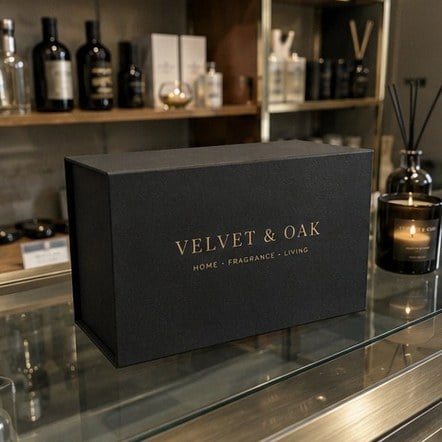
A rigid box wrap is a printed sheet glued around a greyboard shell, folded over every edge and turned in at the top. Artwork that sits near a fold can bend around a corner, and anything placed in the turn-in area ends up partly hidden inside the box. The safe rule is to keep logos and text well inside each panel and let only background color or pattern run across folds.
Each style has its own trouble spots:
- Magnetic-closure and book-style boxes: the front flap and spine both wrap, so a logo centered on the full sheet may land off-center on the lid. See the book-style rigid box page for the structure.
- Two-piece lid and base boxes: the lid sides overlap the base, so artwork on the base sides is often covered when the box is closed.
- Tray and sleeve boxes: the sleeve carries most of the branding, and the tray is seen only when the customer slides it out.
- Rigid mailer boxes: outer panels take shipping wear, so delicate fine lines belong inside the lid.
The free mockup shows the artwork on the folded box, which is where wrap problems become obvious.
How should you set up artwork for foil stamping, embossing and debossing?
Foil, emboss and deboss artwork for custom rigid boxes should be a solid, single-color shape on its own layer, with no gradients, shadows or soft edges. Each finish uses a die or plate made from that shape, so the cleaner the outline, the sharper the result. Mark clearly which elements get which treatment.
- Put the printed design on one layer.
- Put foil elements on a second layer and label the foil color you want, such as gold, silver or a matching brand color.
- Put emboss or deboss elements on a third layer, even if they overlap the foil.
- Avoid very thin lines and very small type in foil or emboss; fine detail can fill in or lose definition.
- Note whether you want a combined effect, such as a foiled and embossed logo.
You do not need to know which plate type or die depth is used. Describe the look you want and the mockup will show how the finish is laid out. For a deeper look at the finishes themselves, the earlier article on soft-touch, foil and emboss covers the options, and this guide focuses only on how to prepare the files.
How do you keep brand colors consistent across paper wraps, sleeves and inserts?
Brand colors stay most consistent on custom rigid boxes when you give exact color references, ideally Pantone numbers, and accept that the same ink can look slightly different on different papers. A coated wrap paper, an uncoated textured paper and a soft-touch laminated wrap each shift color a little, so name your priority color and let the team plan around it.
Practical steps that help:
- List your primary and secondary brand colors by Pantone or CMYK values, not just hex codes from a website.
- Say which surface matters most: usually the outer lid, since it is the first thing a customer sees.
- If the box and a printed sleeve or insert card must match side by side, mention it so both parts are planned together.
- Dark, solid wraps can show scuffs and fold cracking more than light ones; a soft-touch or matte laminate can help, and the mockup notes will flag it.
Screens are not color-accurate, so treat the mockup as a check of layout and color choice rather than an exact ink match. If an exact match is critical, ask about a physical sample before the bulk run.
What should you check on a rigid box mockup before you approve it?
Before you approve a custom rigid box mockup, check spelling, logo version, placement on every panel, finish callouts and the inside of the box. Production follows the approved proof exactly, and you pay nothing until you approve the design, so this is the moment to be thorough. Revisions are unlimited and free.
| Check | What to look for |
|---|---|
| Text | Spelling, taglines, website and social handles, legal lines |
| Logo | Current version, correct colors, not stretched |
| Placement | Centered on the visible lid, clear of folds and turn-ins |
| Finishes | Foil color, emboss or deboss areas marked as intended |
| Interior | Inside-lid message, insert print, ribbon or pull-tab position |
| Consistency | Matches any sleeve, card or bag in the same kit |
Have a second person look at the proof with fresh eyes. Most artwork mistakes on packaging are small: an old phone number, a logo with a retired tagline, or a message that reads well on screen but is too small on the box. Once approved, standard turnaround is about 2 weeks, with faster delivery available through express shipping.
What are the most common rigid box artwork mistakes?
The most common custom rigid box artwork mistakes are placing logos across fold lines, sending low-resolution web images, putting thin detail into foil, and forgetting the inside of the box. Each one is easy to avoid once you know the box is a folded, wrapped object rather than a flat print.
- Designing on a flat rectangle: artwork centered on the flat sheet is often off-center once wrapped.
- Text too close to edges: lid edges take handling wear, and small type there can look crowded.
- Too many effects in one spot: foil, emboss and spot gloss stacked on a busy logo can look muddy instead of premium.
- Ignoring the unboxing order: the inside lid and insert are seen right after opening, and a plain interior can feel like a missed moment.
- Approving on a phone: review proofs on a larger screen so small type and fine lines are visible.
When you are ready, send your files through the custom quote form. The how it works page walks through each step from artwork to delivery, and the main custom rigid boxes page shows every style you can choose from, starting at a minimum of 12 boxes.
Frequently asked questions
Can I send a hand sketch instead of finished rigid box artwork?
Custom rigid boxes can start from a hand sketch, a photo of a mood board or a short written description. Custom Rigid Boxes Now uses that as the brief, adds your logo file and brand colors, and returns a free mockup within 24 hours. You can then refine the layout through unlimited free revisions until the box looks the way you pictured it.
Should I convert fonts to outlines before sending rigid box files?
Custom rigid box files print most reliably when every font is converted to outlines or the font files are included with the artwork. Live text can swap to a default typeface if the font is missing, which changes spacing and can shift a logo or tagline on the lid. Outlining text removes that risk and keeps the mockup and production files identical.
Can different artwork go on the lid, base and inside of a rigid box?
Custom rigid boxes can carry separate artwork on the lid, base, inside lid and insert, because each part is wrapped or printed as its own component. Many brands keep the outside minimal with a foiled logo and put a colorful pattern or thank-you message inside. Custom Rigid Boxes Now shows every surface in the mockup so you can judge the full unboxing.
How should I mark which parts of my logo get foil on a rigid box?
Custom rigid box foil areas are easiest to set up when you place them on a separate layer and label the layer with the foil color you want. If you cannot edit layers, a simple note such as foil the logo mark only, print the wordmark in black is enough. The mockup will show the foil callout so you can confirm before approval.
Can a full-color photo be printed on a rigid box wrap?
Custom rigid box wraps can carry full-color photographs, patterns and illustrations across the lid and sides. A high-resolution image is needed so the picture stays sharp at full lid size, and important subjects should sit away from folds and corners. Custom Rigid Boxes Now checks the image during the free mockup stage and flags anything likely to look soft once printed.
Do rigid box sleeves and belly bands need separate artwork files?
Custom rigid box sleeves and belly bands are printed as separate pieces, so they are laid out separately even if they share your main artwork. Send the logo and any text you want on the sleeve, and the team fits it to the sleeve width and box size. The tray and sleeve rigid box page shows how the sleeve frames the tray beneath.
Can each rigid box in one order have a different name or message?
Custom rigid boxes can vary within a run in some cases, such as different names on insert cards or tags, while the box wrap itself usually stays the same. Ask about personalization when you request a quote and Custom Rigid Boxes Now will explain which parts of the box can change per piece and which must match across the order.
What happens if my logo looks blurry on the rigid box mockup?
Custom rigid box mockups reveal blurry logos early, which is exactly why they come before production. If the file you sent is low resolution, the team will point it out and ask for a vector version from your designer or original brand files. In many cases a clean logo can be redrawn as vector art so foil and print edges stay crisp.
Is it better to use a white or a colored wrap paper for rigid box artwork?
Custom rigid box wrap color depends on the look you want and how your artwork reads against it. White or light papers show printed colors brightly and hide handling marks well, while black, navy or colored papers give a richer base for gold or silver foil. Custom Rigid Boxes Now can mock up both options so you can compare side by side.
Who checks rigid box artwork for problems before production starts?
Custom rigid box artwork is reviewed by the Custom Rigid Boxes Now team when building your mockup, looking at resolution, fold placement, foil detail and color notes. Final sign-off still belongs to you, because production follows the approved proof exactly. Read the proof carefully, ask for changes as often as you need, and approve only when every panel is correct.
Can I reuse the same rigid box artwork for a different box style later?
Custom rigid box artwork can usually move to a new style, but the layout must be refitted because each style wraps differently. A logo set for a magnetic-closure lid will need new placement on a drawer sleeve or two-piece lid. Send your approved files with the new request, and a fresh free mockup will show the artwork on the new structure.
Get a free mockup for your rigid boxes now
Send your logo or idea and the quantity you have in mind. Custom Rigid Boxes Now returns a free mockup within 24 hours, you approve the design before anything is produced, and standard turnaround is about two weeks with faster options available. Get a custom quote.